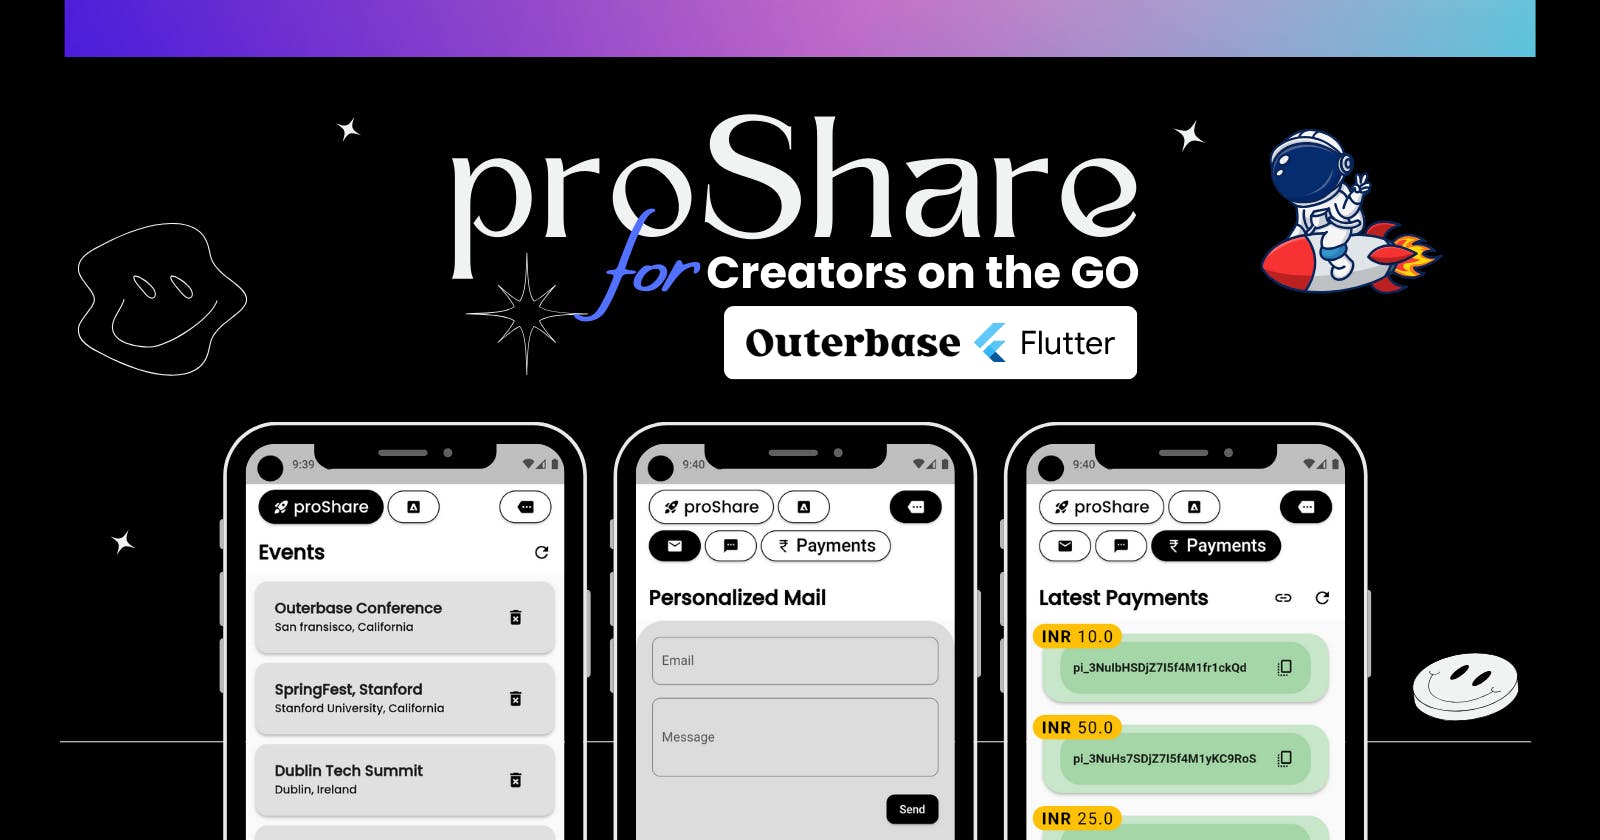
proShare - for Creators on the Go
A Complete Solution for Creators who Move Places.


Table of contents
- Before you Begin 😊
- ✨ The Problem Statement :
- 🦄 Outerbase to the Rescue
- 🧑💻 Project Overview
- ⚒️ TechStack
- 🤖 Outerbase Plugins
- 🦩 Outerbase Dashboard
- 🐈 Business Perspective
- 🤠 Conclusion
- 🎥 VIDEO DEMO & GITHUB LINKS
- Thank you.🫡
Before you Begin 😊
This Hackathon was a Great Opportunity for Me to Understand and Experiment With Outerbase and its Services. I am very thankful to the Active Community of Outerbase for clearing doubts and helping wherever needed. The Following Article might be Long and Messy, Please Deal with it. I tried to use my Unrecognizable Design skills to represent some topics in Infographics, and a Demo Video at the End. Happy Reading.
✨ The Problem Statement :
Tech Influencers/Content Creators, Often Travel to Different Locations to Attend Various Tech Events and keep their Audience Updated about several things like Sharing Event Recommendations. But Doing all this in their Journey is a Time-Consuming Process as there are multiple social networks with a variety of Audiences. They need a Dedicated App For Managing all this Stuff at Once with just a click. May it be Collecting Payment on the Go or Sharing Personalized Messages with Users without sharing their Numbers?
🦄 Outerbase to the Rescue
To Make a Dedicated App to solve this real-world problem The Suitable Solution uses Outerbase, which can help Automate Tasks through Commands and enrich the Messed Up Data Viewing Experience using Dashboards and Plugins while Providing an SQLite Database.
Services Used :
Commands
Plugins
Dashboards
SQLite Database
Queries/EZQL
🧑💻 Project Overview
In today's fast-paced digital world, managing and sharing Event data (in this context) seamlessly is essential, especially for content creators and administrators. The proShare app, built using Flutter, provides a comprehensive solution for content creators to efficiently manage and share event information with their audience. This blog will walk you through the innovative features of the proShare app, its integration with popular communication platforms like Discord, Slack, and Telegram, as well as its utilization of the OpenAI API for engaging content sharing, allowing Creators to send personalized Messages and Emails to New Individuals, and Sell their Products on the GO using Payments Links. Furthermore, we will explore how Outerbase, a powerful data management platform, plays a pivotal role in enhancing the proShare app's functionality with Customized Plugins and Dashboards.
⚒️ TechStack
Flutter Framework
Outerbase as Backend
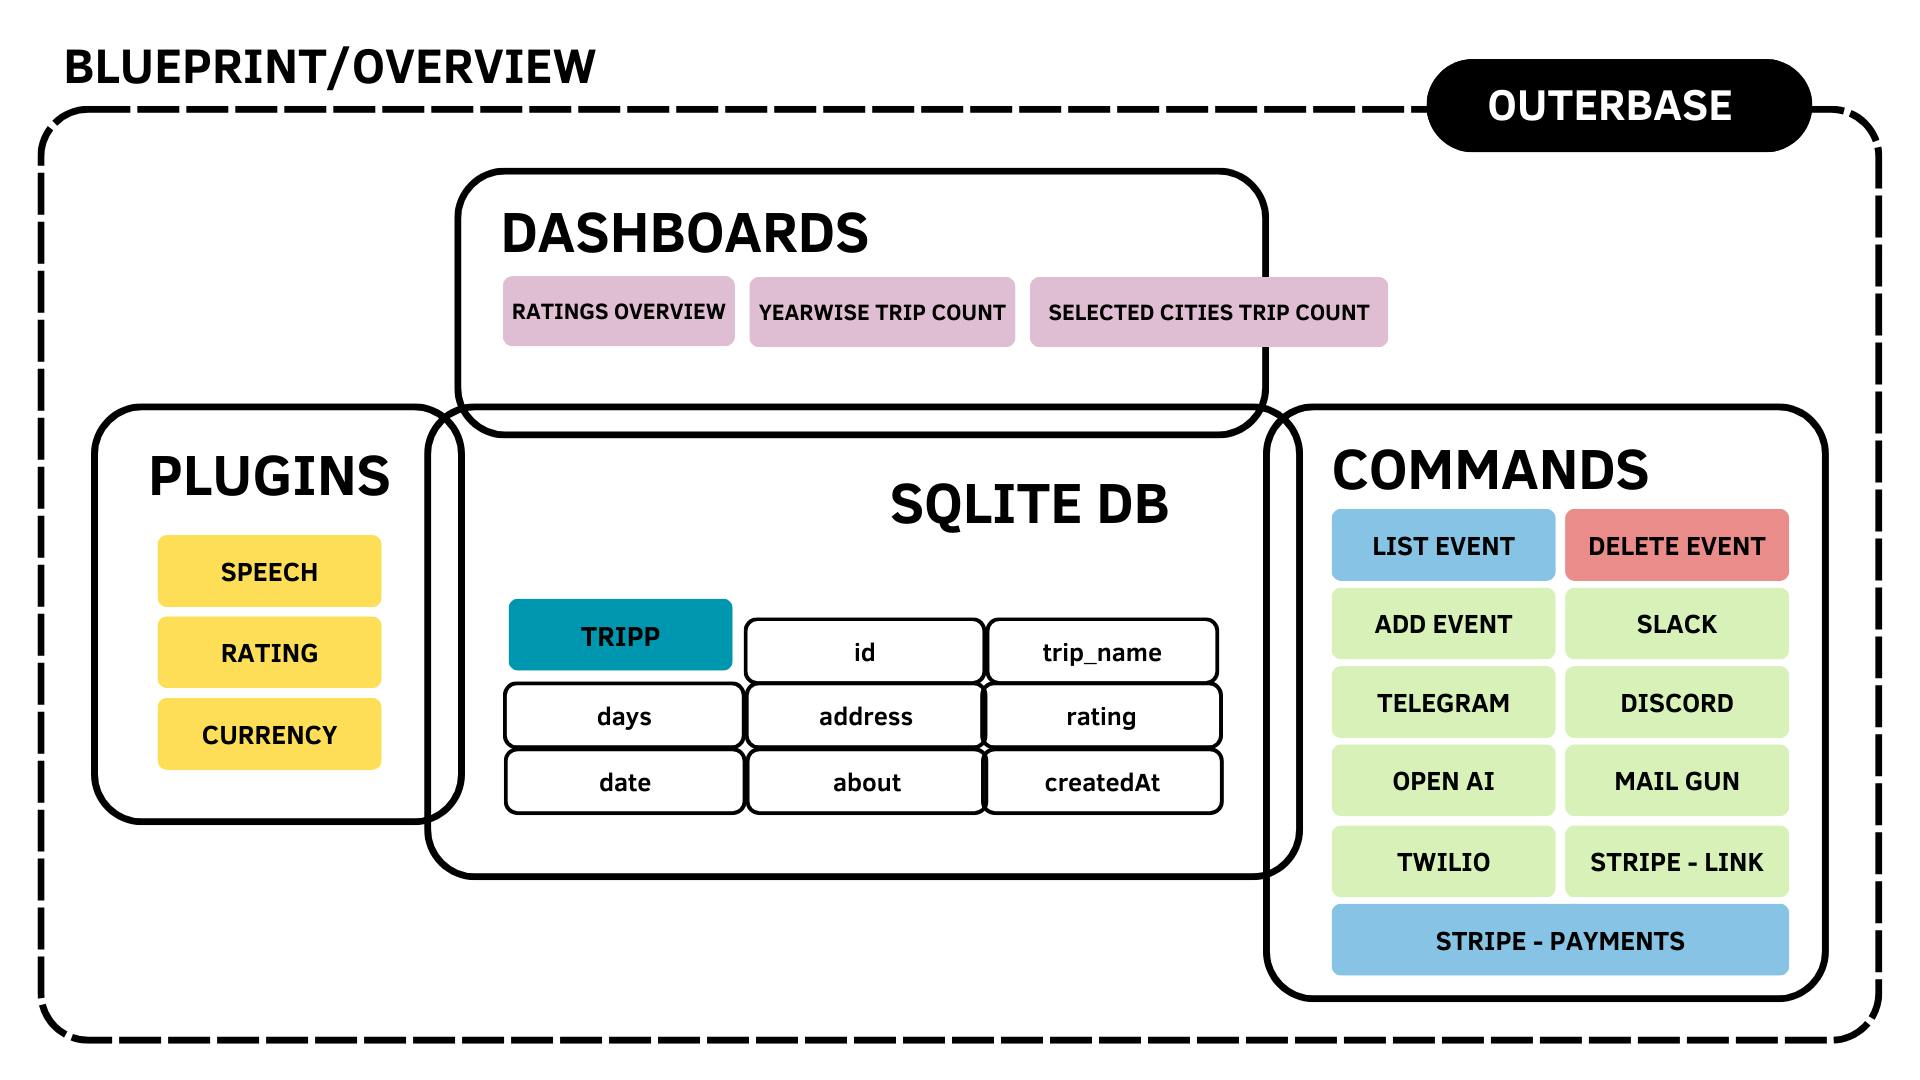
🐳Overview of Everything Used
✨ proShare App - Key Features
Event Data Management: The proShare app offers a user-friendly interface for administrators and content creators to effortlessly input Event data. The app features a floating button that allows users to add data to rows, making it convenient to record information such as trip/event names, duration, addresses, dates, ratings, and additional details.
Integration with Communication Channels: proShare goes beyond data collection by enabling seamless integration with popular communication platforms like Discord, Slack, and Telegram using their Webhooks and Outerbase Commands. With just a few clicks, administrators can share Event data directly with their audience.
Engaging Content with OpenAI: To keep the audience engaged and informed, proShare leverages the power of the OpenAI API. Administrators can choose specific prompts and questions, and with a single click, the app shares thought-provoking content with the audience on Discord.
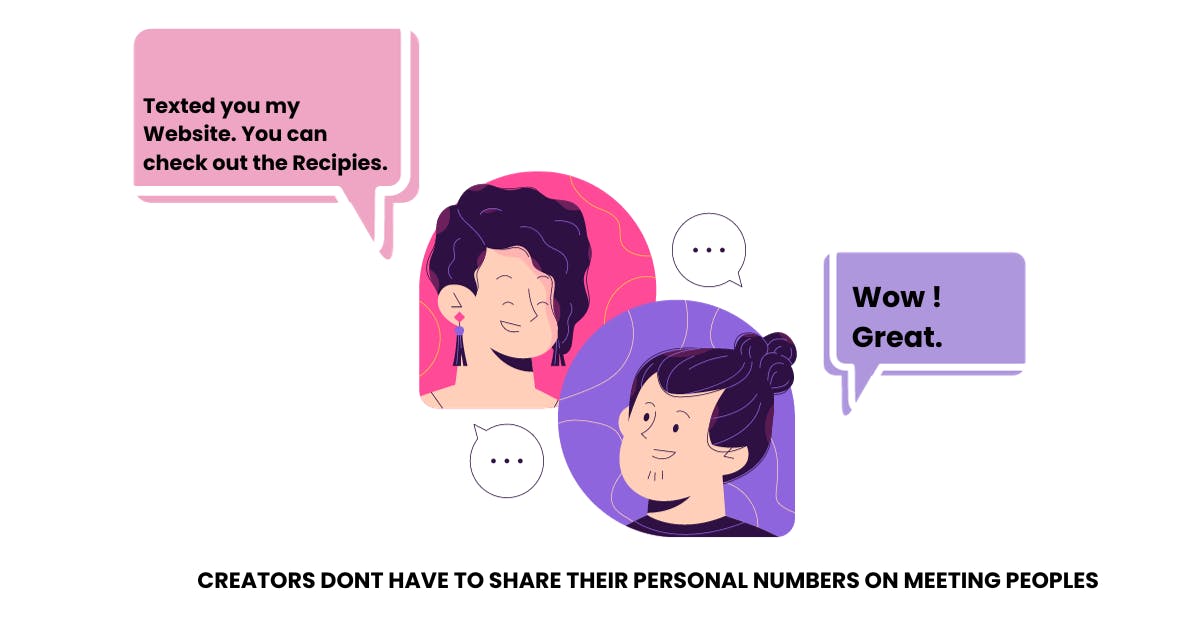
Personalized Text & Mails: Helps Creators Send Advice and Recommendations to Individuals without disclosing Their Numbers.
Payments: Helps Creators to Send Payment links with just a click of a button irrespective of where the creator is and Get updates about Successful payments by verifying the Transaction ID with the customer on the spot.
✨ Outerbase: Elevating Data Management
Data Enrichment with Dashboards: Outerbase offers dynamic dashboards that empower administrators to enrich their data viewing experience. These dashboards provide comprehensive insights and visualizations, helping content creators make informed decisions based on trip data.
EZQL for SQL Query Generation: Simplifying database management, Outerbase introduces EZQL, a powerful tool that allows users to generate SQL queries by describing their requirements in plain words. This intuitive feature eliminates the need for intricate coding and accelerates data retrieval and manipulation.
Data Personalization Plugins: Outerbase further enhances the proShare app's capabilities with plugins designed for data personalization. Administrators can tailor their data to meet specific audience preferences, ensuring that trip or event information is presented in a way that resonates with their viewers.
🦒SQLite Database by Outerbase
proShare relies on the robust SQLite database provided by Outerbase. Within this database, administrators can create a dedicated table named 'tripp' with eight essential columns: ID, Event Name, Days, Address, Date, Rating, create date, and About. This structured approach simplifies data organization.
Below is the image of my Table Tripp, inside proShare Database.

🐬Utilizing Outerbase Commands In the App
When I learned about Commands It seemed very Interesting. Here is my overview of commands used, that perform various tasks.

POST, GET & DELETE EVENTS COMMANDS
To receive the Input from the App, List the Data in the App and the Ability to Delete it. I created 3 SQL commands to perform the Respective Operation. The SQL Queries are Generated using EZQL provided by Outerbase. I liked the idea of EZQL.

In the Image Below, View of my Flutter App. I am displaying a ListView Widget in Flutter to get data from SQLite using the Above Commands. Similarly, the Delete Button in each List Tile is used to remove the Row Data in SQLite, Each of the Rows has a Unique ID to distinguish between them.
The App also has a Floating Button at the Bottom Area of the Screen, which when Clicked Opens a Dialog to Take the Required Inputs and Save it Inside our Database.
(For each of the STEPS performed here in the Entire Blog, I have added a Video Demo at the End of the Blog. )

SLACK, TELEGRAM & DISCORD COMMANDS
Furthermore, I created 3 More Commands named Slack, Telegram, and Discord channels to Post the Details of Each List Item in their respective Tripp channels.
To make this happen, I created channels/Bots and got its webhook to trigger tasks.
In the Below Image, when a List Item is Clicked, a Customised Bottom Sheet Widget Shows Up with the Event Details. Along with It, three separate Buttons trigger the respective commands and Post the Data to Slack, Telegram and Discord Bots.

CODE (JUST FOR QUICK VIEW) :
//COMMON DATA USED ACROSS THE THREE COMMANDS
  const trip_name = {{request.body.trip_name}}
  const days = {{request.body.days}}
  const date = {{request.body.date}}
  const address = {{request.body.address}}
  const rating = {{request.body.rating}}
  const about = {{request.body.about}}

//DISCORD COMMAND
function userCode() {
  const webhookUrl = 'https://discord.com/api/webhooks/XYZ123';

  const data = {
  username: 'Tripp',
  content: ':airplane_small: ' + trip_name,
  embeds: [
    {
      title: ':sparkles: ' + days + ' Days Trip from :date: ' + date + ' :round_pushpin: ' + address + ' :stars: ' + rating + ' Stars',
      description: about,
    },
  ],
  };

  const requestOptions = {
    method: 'POST',
    headers: {
      'Content-Type': 'application/json',
    },
    body: JSON.stringify(data),
  };

  //Fetch Function At the End
}

//SLACK COMMAND

function userCode() {
    const webhookUrl = 'https://hooks.slack.com/services/XYZ123';
    const data = {
        text: '🛩️' + {{request.body.trip_name}},
        attachments: [
            {
                fields: [
                    { title: '⏳ Days', value: {{request.body.days}}, short: true },
                    { title: '🗓️ Date', value: {{request.body.date}}, short: true },
                    { title: '📍 Address', value: {{request.body.address}}, short: true },
                    { title: '✨ Rating', value: {{request.body.rating}}, short: true },
                    { title: '📜 About', value: {{request.body.about}} },
                ],
            },
        ],
    };

    const requestOptions = {
        method: 'POST',
        headers: {
            'Content-Type': 'application/json',
        },
        body: JSON.stringify(data),
    };

    //Fetch Function At the End
}

//TELEGRAM COMMAND

function userCode() {
  const botToken = 'XYZ:123'; // Telegram bot token
  const chatId = '123'; // Telegram chat ID

  const messageText = `🛩️ <b>${tripName}</b>\n 🗓️ ${days} Days Trip on ${date}\n 📍 ${address}\n ✨ ${rating} Stars\n 📜 ${about}`;
  const webhookUrl = `https://api.telegram.org/bot${botToken}/sendMessage`;
  const requestData = {
    chat_id: chatId,
    text: messageText,
    parse_mode: 'HTML',
  };
  const requestOptions = {
    method: 'POST',
    headers: {
      'Content-Type': 'application/json',
    },
    body: JSON.stringify(requestData),
  };

  //Fetch Function At the End
}

//The code uses the fetch function to make an asynchronous
//HTTP POST request to the Telegram/Slack/Discord API using
//the webhook URL and request options with Response Handling.
//COMMON DATA

fetch(webhookUrl, requestOptions)
    .then((response) => {
      if (response.ok) {
        return response.json();
      } else {
        throw new Error('Failed to send message to Respective Channel');
      }
    })
    .then((responseData) => {
      console.log(responseData);
    })
    .catch((error) => {
      console.error(error);
    });
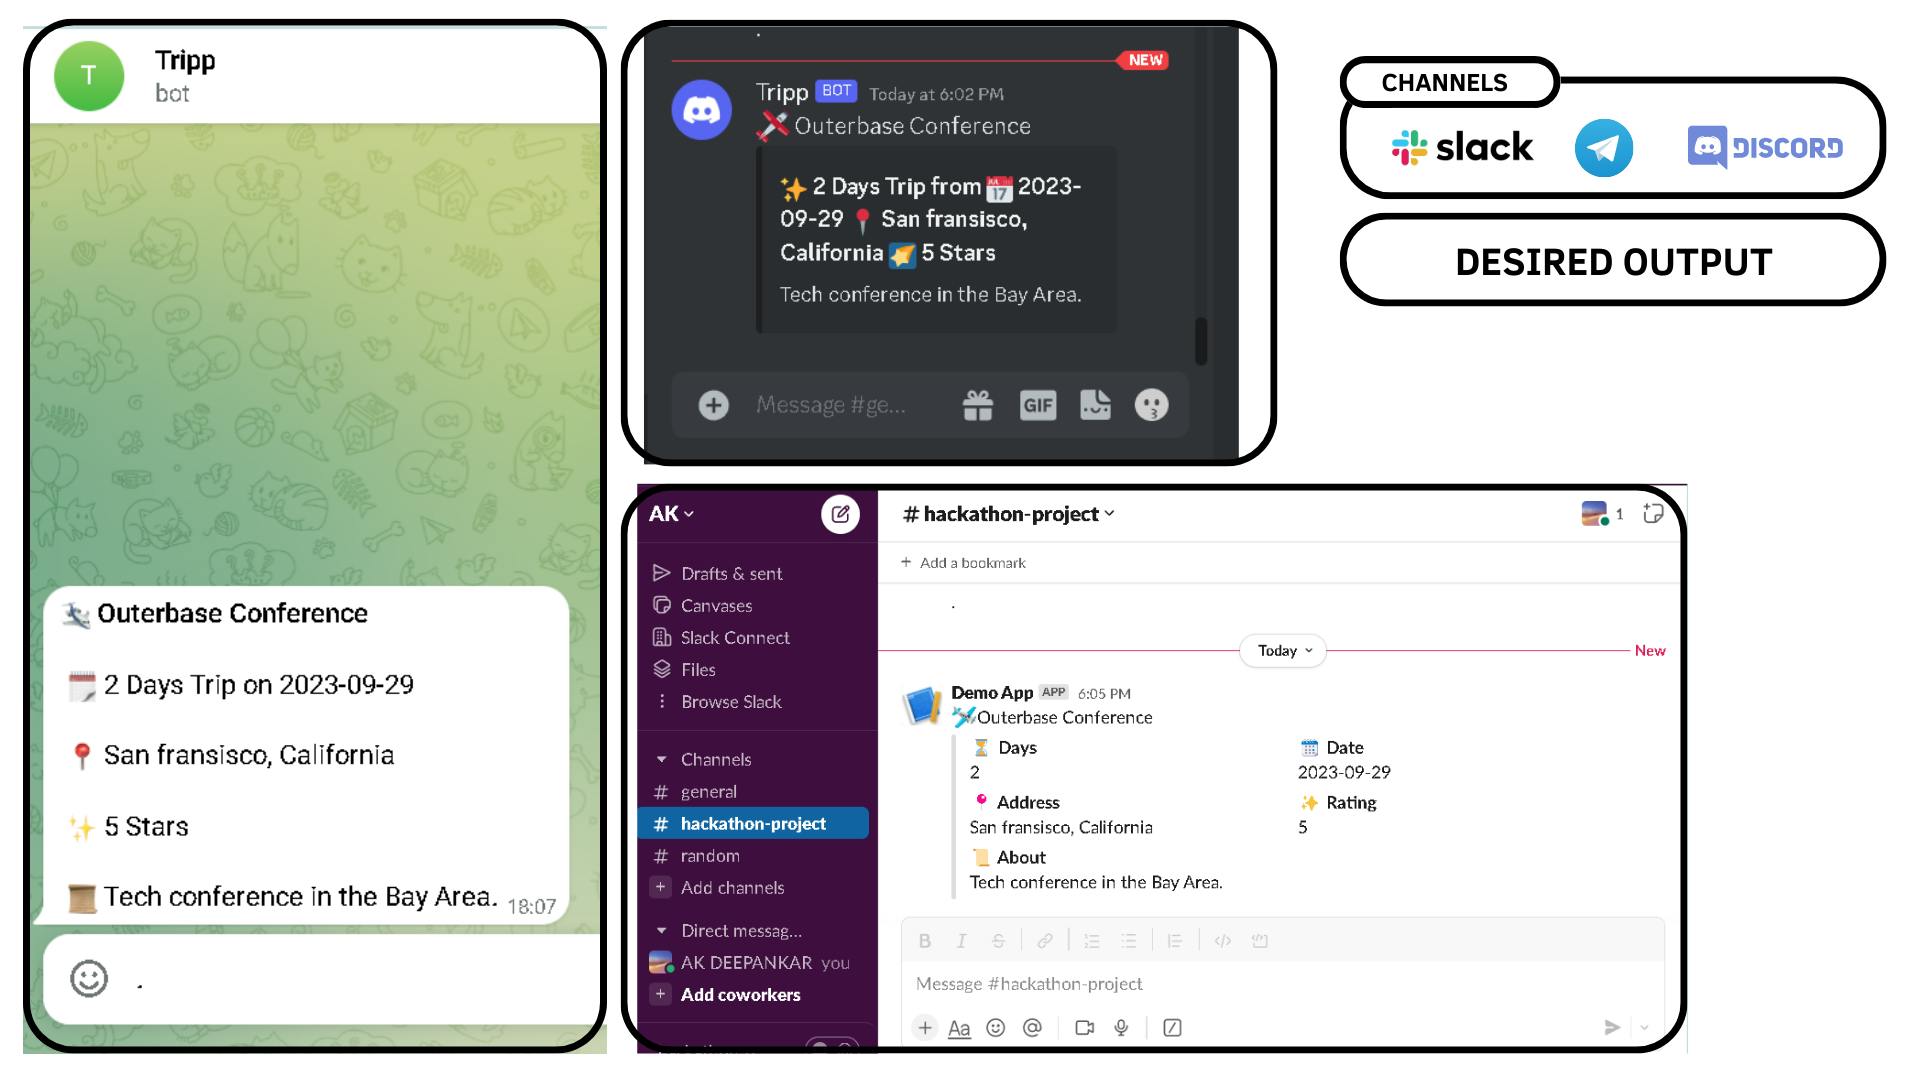
After Performing the Above Actions, these are the Outputs in Telegram, Discord and Slack channel.
OPEN AI COMMAND
There is also a Prompt Tab in the App connected to its Command 'OPEN AI', where it has three nodes that take the input prompt, get the answer, and post it to the discord channel.

//NODE 1
async function userCode() {
  // OpenAI API endpoint and API key
  const openaiEndpoint = 'https://api.openai.com/v1/engines/davinci/completions';
  const apiKey = 'API123';
  // Defining the Prompt
  const prompt = {{request.body.prompt}};
  const headers = {
    'Content-Type': 'application/json',
    'Authorization': `Bearer ${apiKey}`,
  };
  const requestBody = {
    prompt: prompt,
    max_tokens: 300,
    temperature: 0.5
  };

  try {
    // Sending a POST request to OpenAI API and awaiting the response
    const response = await fetch(openaiEndpoint, {
      method: 'POST',
      headers: headers,
      body: JSON.stringify(requestBody),
    });

    if (response.ok) {
      const data = await response.json();
      if (data !== null && data !== undefined) {
        return data;
      } else {
        console.error('Received null or undefined data from GPT-3.');
        return 'An error occurred while communicating with GPT-3.';
      }
    } else {
      console.error('Error:', response.statusText);
      return 'An error occurred while communicating with GPT-3.';
    }
  } catch (error) {
    console.error('Error:', error);
    return 'An error occurred while communicating with GPT-3.';
  }
}

//NODE 2
function userCode() {
    const new_data = {{node-1.choices}}
    return new_data[0];
  // console.log(jsonObject.choices[0].text); //Objects Didn't Worked Out for Me
}

//NODE 3
//GETTING THE DATA FROM NODE 2 AND SAME AS THE DISCORD COMMAND
const desc = {{node-2.text}}
//SAME LOGIC, FOR FULL CODE YOU CAN CHECK MY GITHUB
//LINK ATTACHED TO THE END OF THIS BLOG
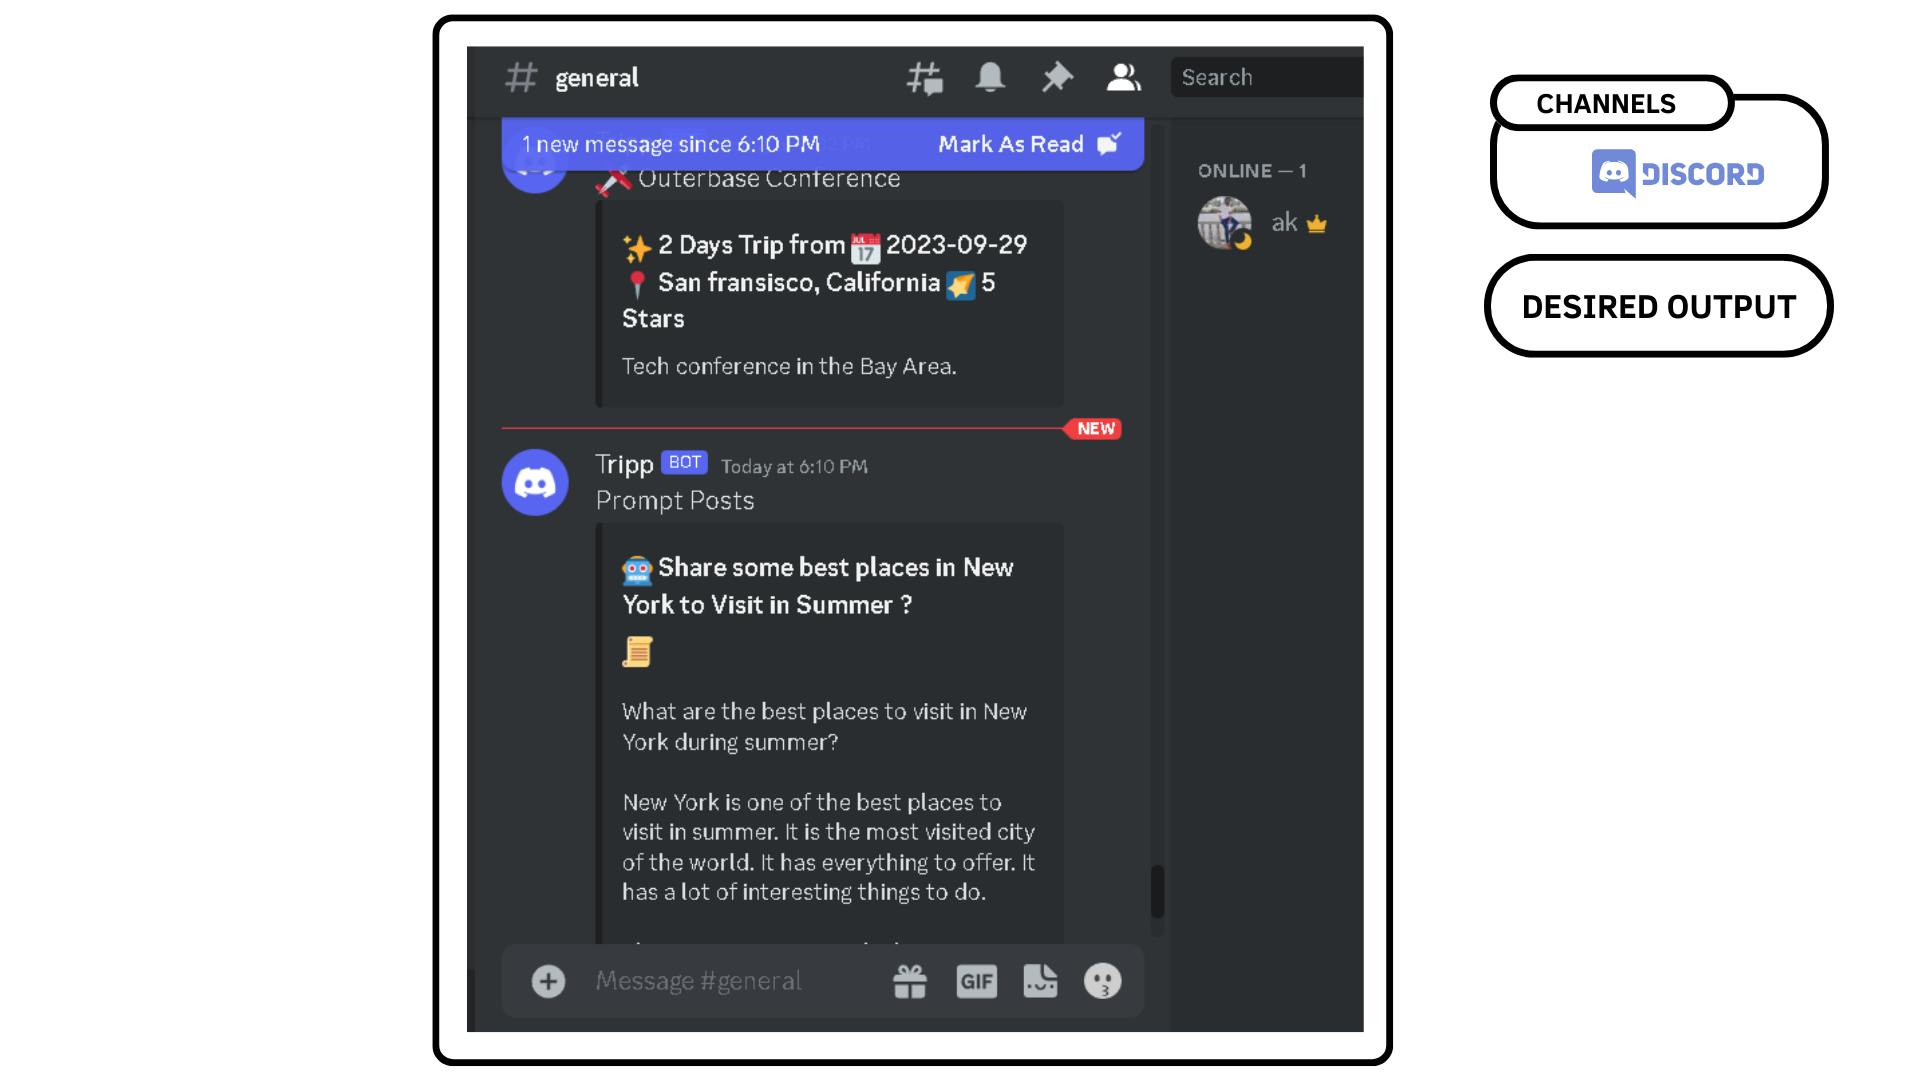
Below Image is the Expected Output! (For each of the STEPS performed here in the Entire Blog, I have added a Video Demo at the End of the Blog. )
TWILIO AND MAILGUN COMMANDS
Personalized Mail and Text are two features of the proShare App that allow creators in the go to share with Individuals they meet at an event or around where they travel, maybe it is their personal stuff details or suggestions whenever they are outside using their Twilio numbers and Mailgun-specific emails, without sharing their private numbers and emails.
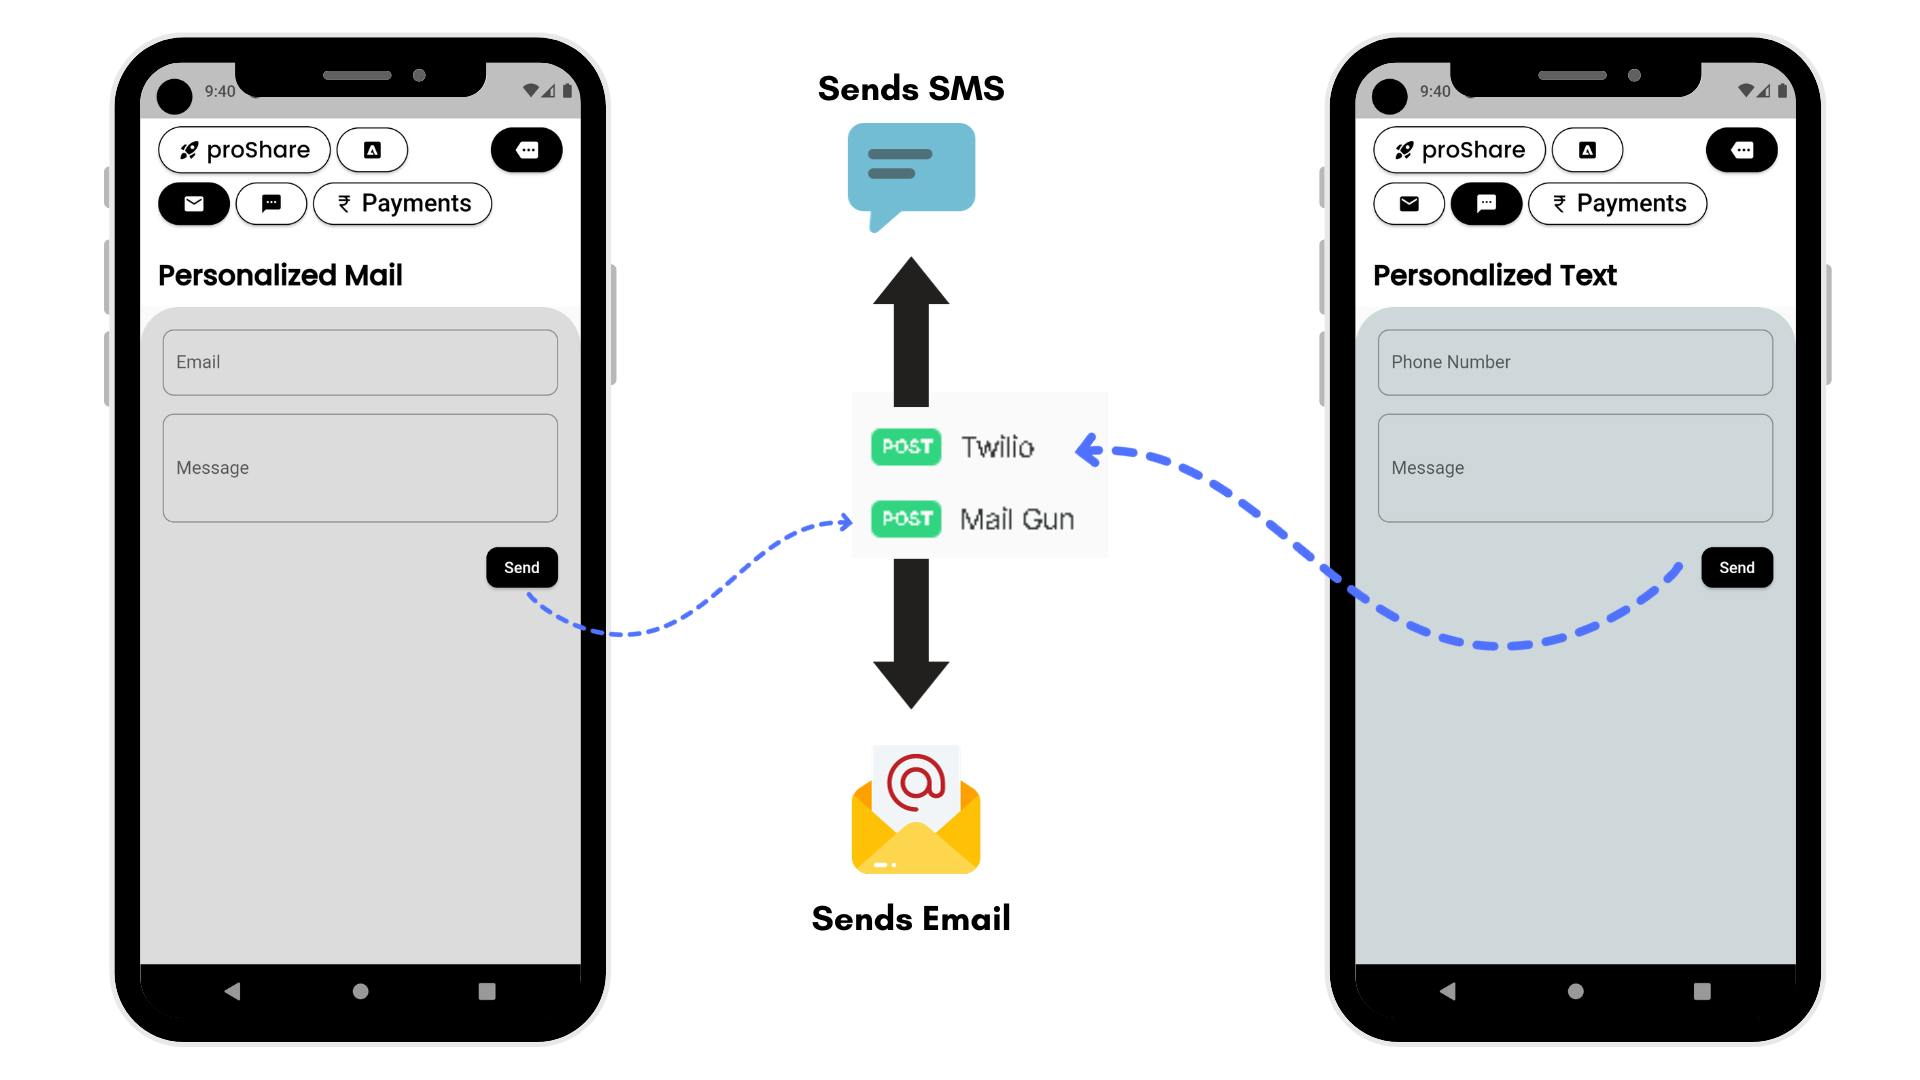
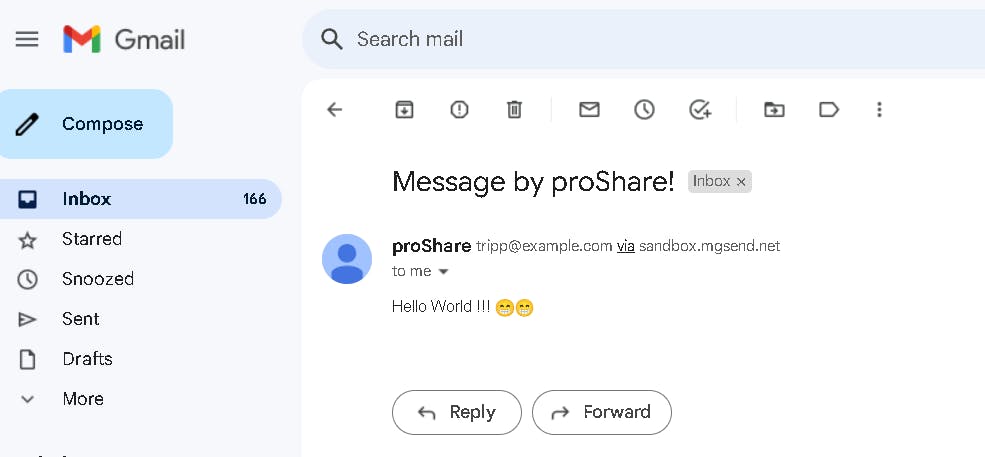
OUTPUT FOR MAILGUN : (Output for Twilio is in Next Part with Payments)
//MAILGUN COMMAND
async function userCode() {
  const mailgunApiKey = 'API KEY CAN BE ACCESSED IN MAILGUN ACCOUNT';
  const mailgunDomain = 'DOMAIN KEY';
  const recipientEmail = {{request.body.email}};
  const subject = 'Message by proShare!';
  const message = {{request.body.message}};

  const mailgunUrl = `https://api.mailgun.net/v3/${mailgunDomain}/messages`;

  const params = new URLSearchParams();
  params.append('from', 'proShare <tripp@example.com>');
  params.append('to', recipientEmail);
  params.append('subject', subject);
  params.append('text', message);

  const requestOptions = {
    method: 'POST',
    headers: {
      'Authorization': `Basic ${btoa(`api:${mailgunApiKey}`)}`,
      'Content-Type': 'application/x-www-form-urlencoded',
    },
    body: params.toString(),
  };

  return fetch(mailgunUrl, requestOptions)
    .then((response) => {
      if (response.status === 200) {
        return 'Email sent successfully.';
      } else {
        return 'Failed to send email.';
      }
    })
    .catch((error) => {
      console.error('Error sending email:', error);
      return 'An error occurred while sending the email.';
    });
}

//TWILIO COMMAND

async function userCode() {
  const phone = {{request.body.phone}};
  const accountSid = 'SID KEY';
  const authToken = 'AUTH TOKEN';
  const twilioPhoneNumber = '+#000000000';
  const messageBody = {{request.body.message}};

  const twilioUrl = `https://api.twilio.com/2010-04-01/Accounts/${accountSid}/Messages.json`;

  const authHeader = 'Basic ' + btoa(`${accountSid}:${authToken}`);

  const requestBody = new URLSearchParams();
  requestBody.append('To', phone);
  requestBody.append('From', twilioPhoneNumber);
  requestBody.append('Body', messageBody);

  return fetch(twilioUrl, {
  method: 'POST',
  headers: {
    'Authorization': authHeader,
    'Content-Type': 'application/x-www-form-urlencoded',
  },
  body: requestBody.toString(),
  })
  .then(response => response.json())
  .then(data => {
    console.log('SMS sent successfully:', data.sid);
    return 'SMS sent successfully.';
  })
  .catch(error => {
    console.error('Failed to send SMS:', error);
    return 'Failed to send SMS.';
  });
}
STRIPE GET AND POST PAYMENT LINK COMMANDS
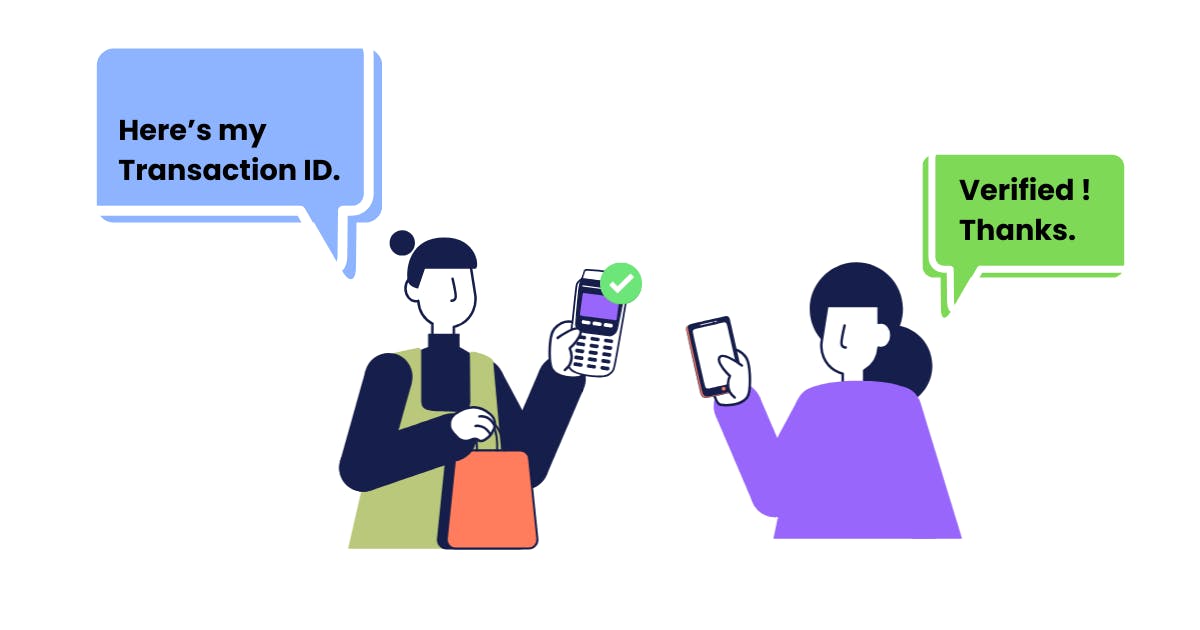
The creator can sell their products easily on the go, maybe in an outdoor event or on the subway. A payment link can be created which can be directly sent to the customer sms, and he can seamlessly pay for the product, The Latest payments are captured and redirected in the Latest Payment view in the App which is a ListView Widget, It displays the Latest Payment Amount and Transaction ID to verify with the Customers on the Spot.
On the Admin/Creator's Phone:
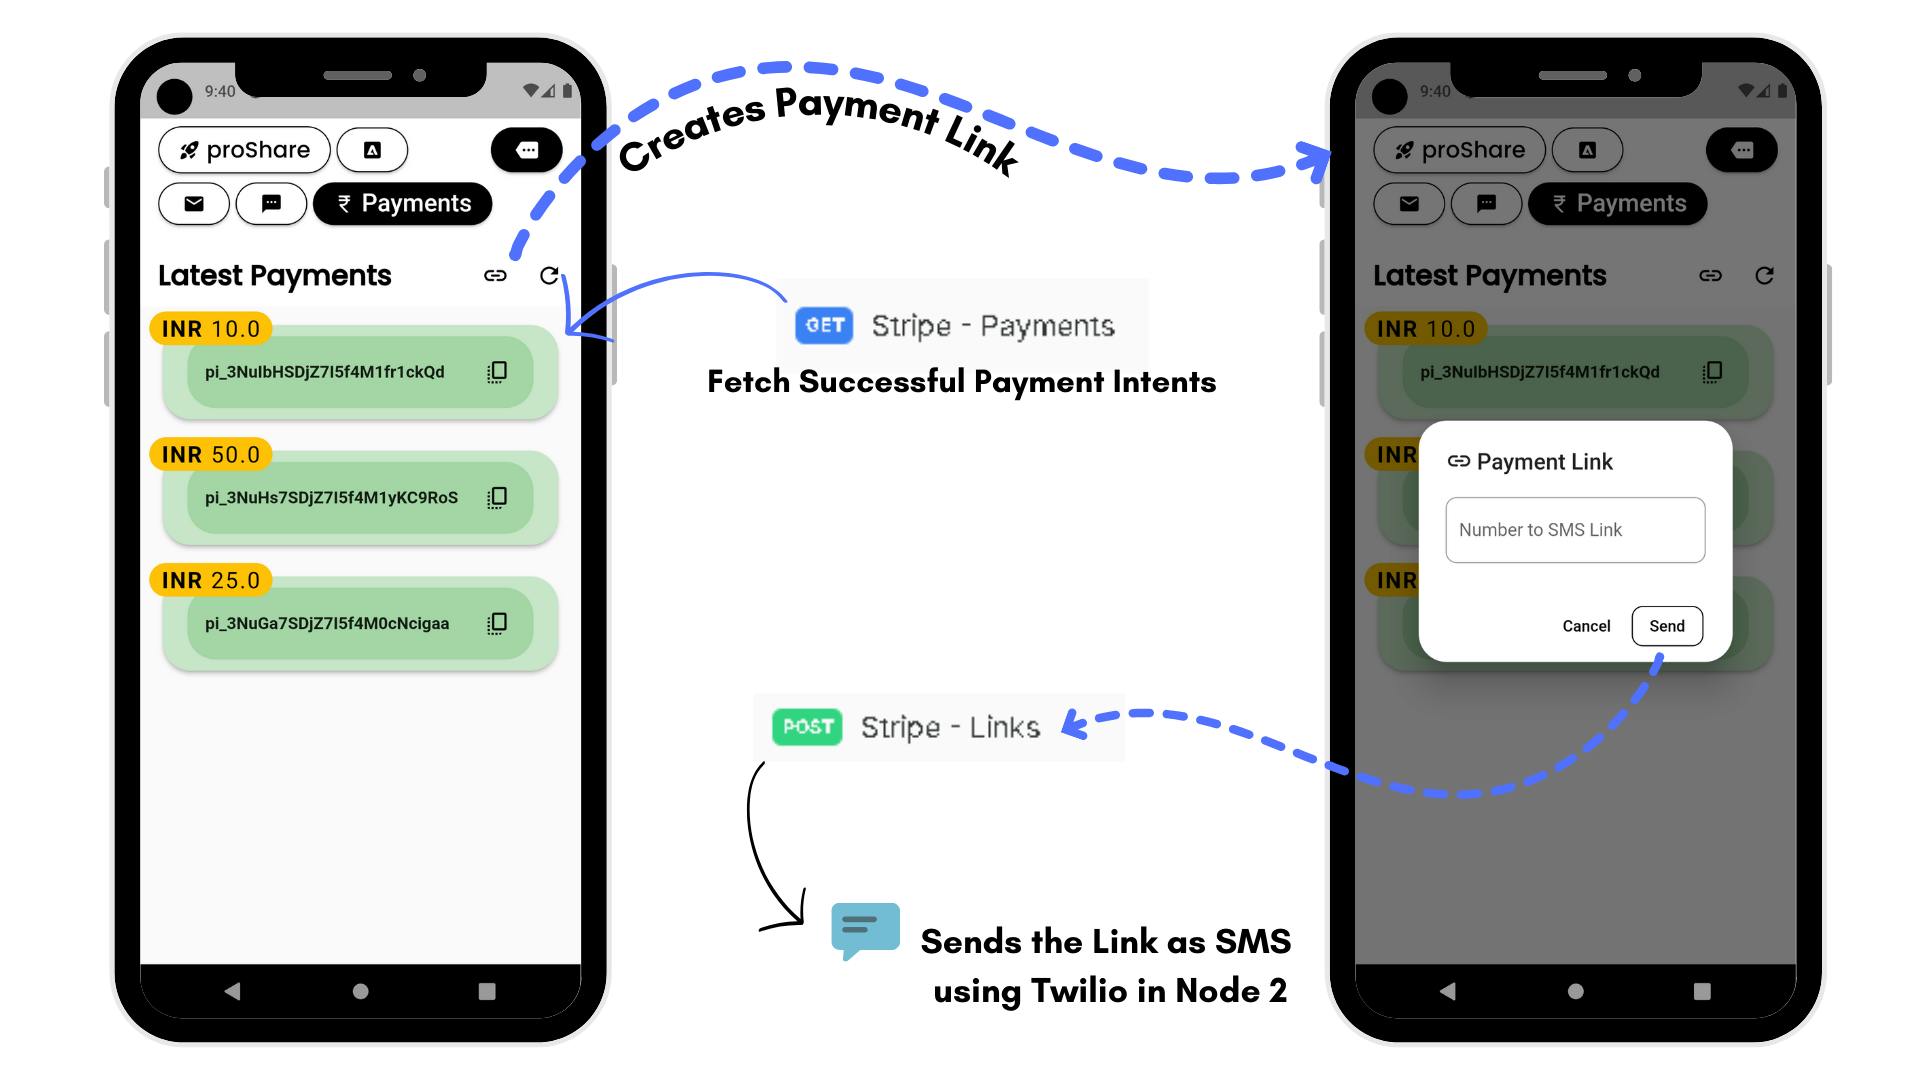
On the Customers Phone :
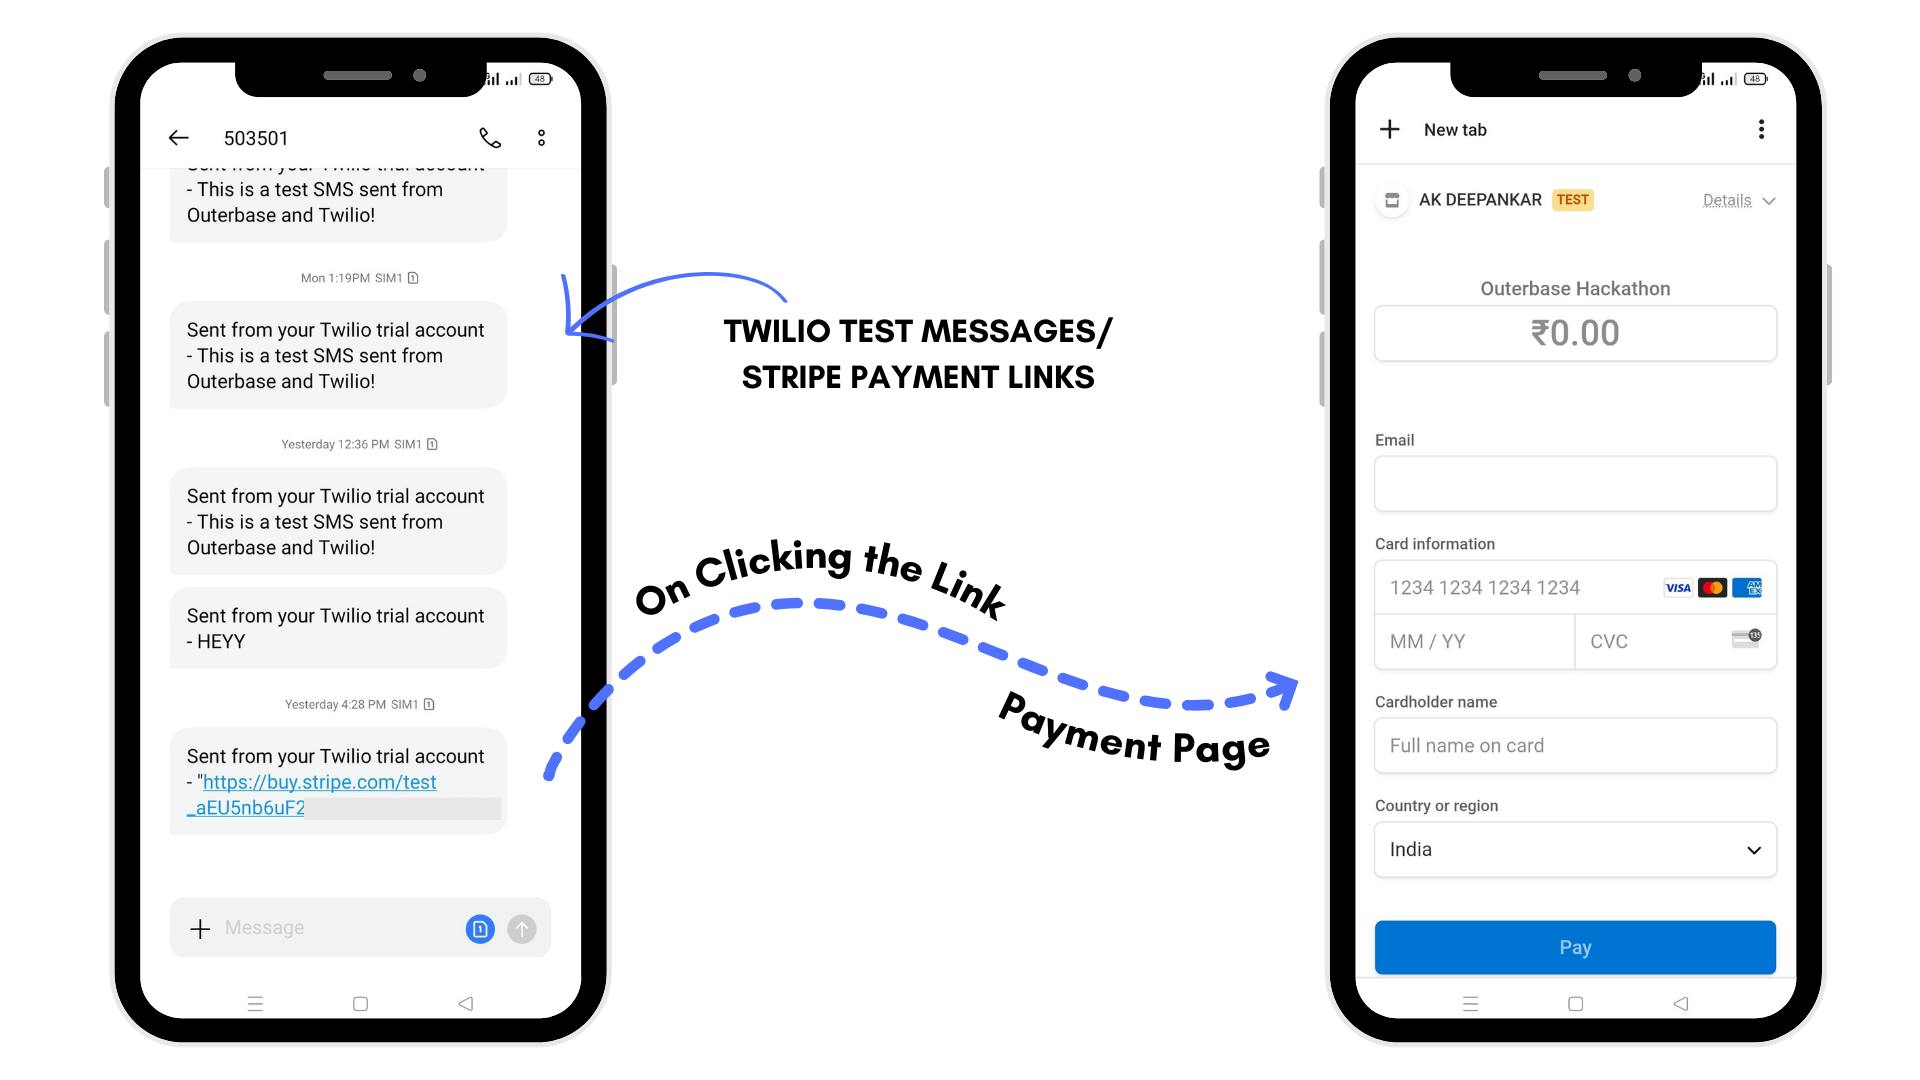
//STRIPE PAYMENT LINK
async function userCode() {
    try {
      const stripeSecretKey = 'STRIPE SECRET TEST KEY';

      // Price ID.
      const priceId = 'PRICE ID';

      const stripeUrl = 'https://api.stripe.com/v1/payment_links';
      const authHeader = 'Basic ' + btoa(stripeSecretKey + ':');

      const requestBody = new URLSearchParams();
      requestBody.append('line_items[0][price]', priceId);
      requestBody.append('line_items[0][quantity]', '1');

      const response = await fetch(stripeUrl, {
        method: 'POST',
        headers: {
          'Authorization': authHeader,
          'Content-Type': 'application/x-www-form-urlencoded',
        },
        body: requestBody.toString(),
      });

      const data = await response.json();
      console.log('Test payment link created:', data.url);
      return data.url;
    } catch (error) {
      console.error('Failed to create test payment link:', error);
      return 'Failed to create test payment link.';
    }
  }
//NODE 2 CONTAINS THE SAME TWILIO, BUT IT INHERITS THE LINK
//TO THE MESSAGE PART OF NODE 2

//STRIPE PAYMENT INTENT LINK - IT FETCHES ALL THE PAYMENTS

async function userCode() {
    try {
      const stripeSecretKey = 'STRIPE SECRET TEST KEY';

      // GET request to retrieve payment data
      const stripeUrl = 'https://api.stripe.com/v1/payment_intents';

      const authHeader = 'Basic ' + btoa(stripeSecretKey + ':');

      const response = await fetch(stripeUrl, {
        method: 'GET',
        headers: {
          'Authorization': authHeader,
          'Content-Type': 'application/json',
        },
      });

      if (response.ok) {
        const data = await response.json();
        console.log('Payment data fetched successfully:', data);
        return data;
      } else {
        console.error('Failed to fetch payment data:', response.statusText);
        return 'Failed to fetch payment data.';
      }
    } catch (error) {
      console.error('Error:', error);
      return 'An error occurred.';
    }
  }
🤖 Outerbase Plugins
I created a Total of Three Plugins that are essential for content creators and can help in their user experience of viewing the data in SQLite. Also Added the Function Snippet of Each Plugin - The code structure Remains the Same, which can be found in my GitHub. Links are attached at the End. Also, one Demo video of Commands and plugins is Attached at the End.
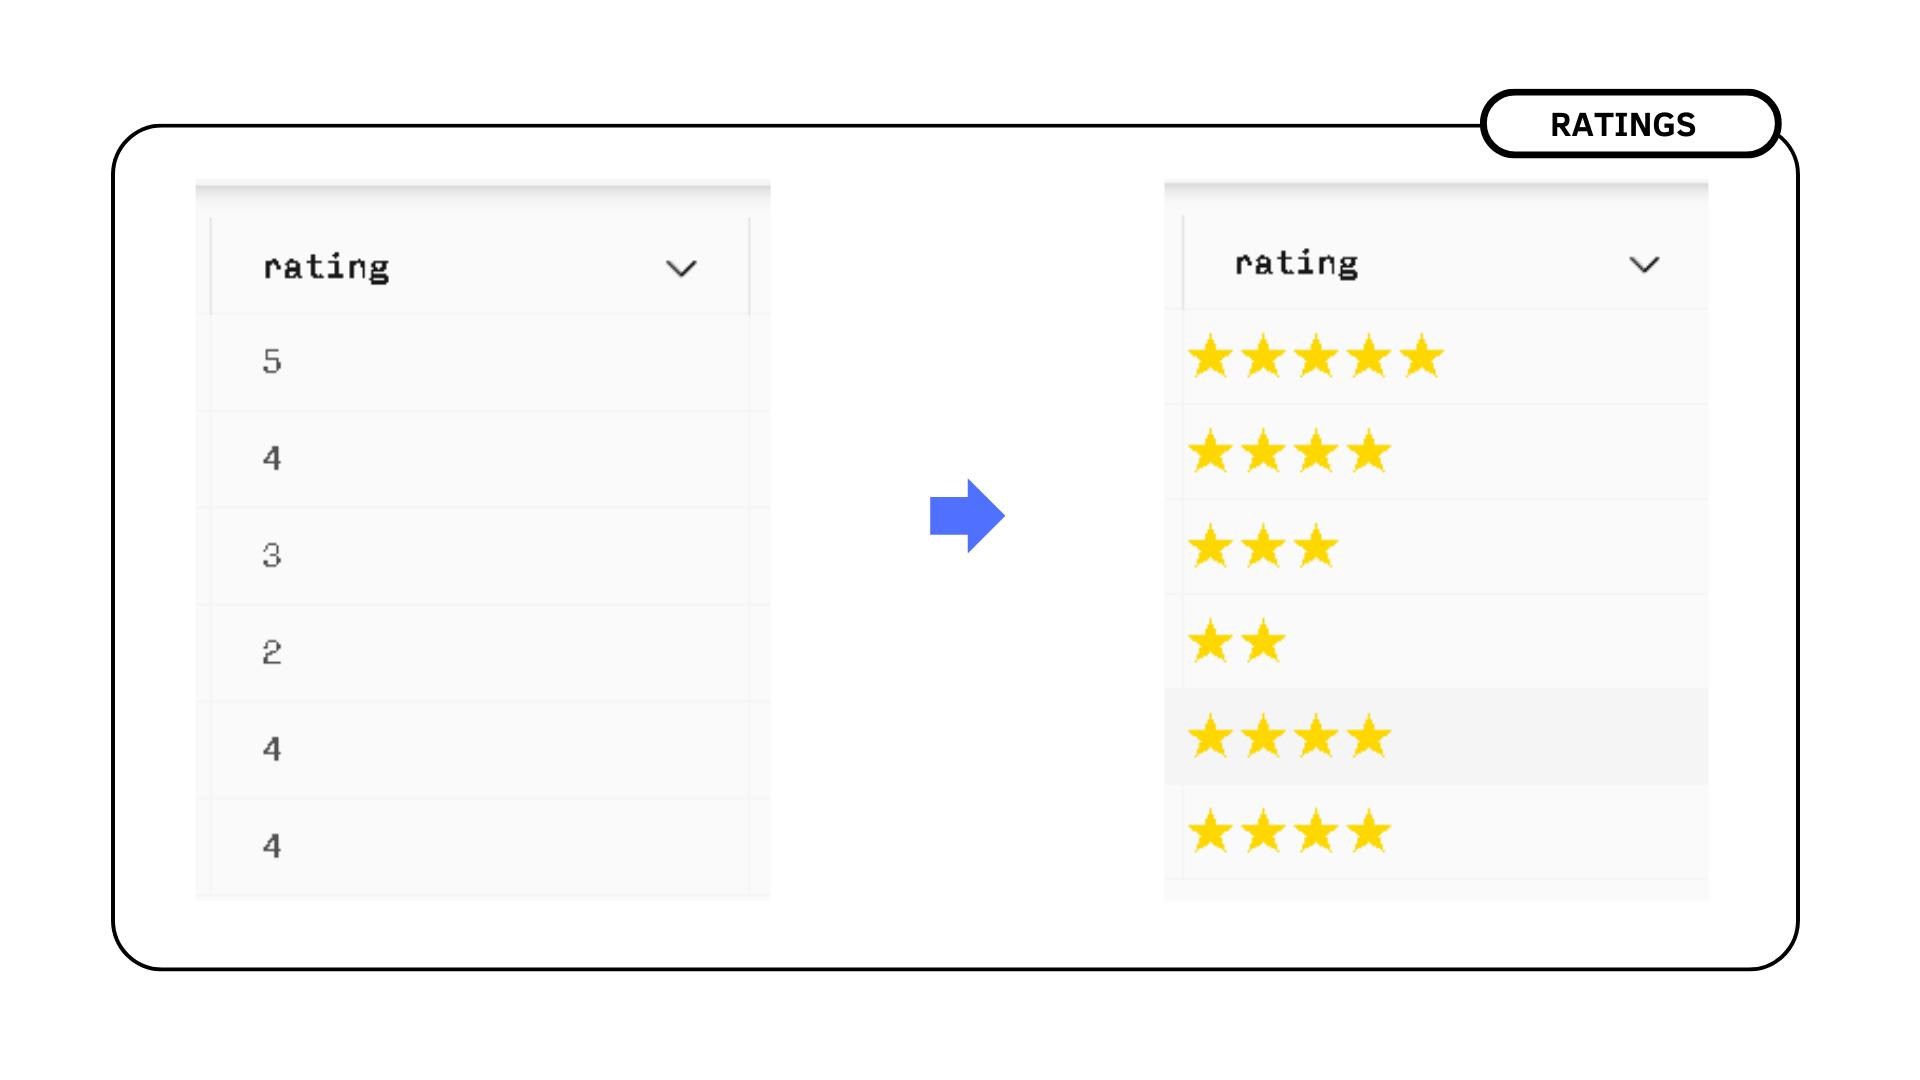
1) Rating Plugin
It is a Column plugin that works with 5 Scale Ratings to convert it to Stars for a Better View. A demo video is at the End of this Article.
// ONLY THE FUNCTION PART - FULL CODE IN GITHUB - LINK ATTACHED END OF ARTICLE
// Function to set the star rating based on the numeric value.
    setStarRating(value) {
        // Selecting the rating container element.
        const ratingElement = this.shadow.querySelector('#rating');

        // Creating stars based on the value.
        for (let i = 1; i <= value; i++) {
            const starElement = document.createElement('span');
            starElement.classList.add('star');
            starElement.textContent = '★';
            ratingElement.appendChild(starElement);
        }
    }

    // Lifecycle callback when the element is connected to the DOM.
    connectedCallback() {
        // Parsing the cell value and seting the star rating.
        const cellValue = this.getAttribute('cellvalue');
        const numericValue = parseInt(cellValue);

        if (!isNaN(numericValue) && numericValue >= 1 && numericValue <= 5) {
            this.setStarRating(numericValue);
        }
    }
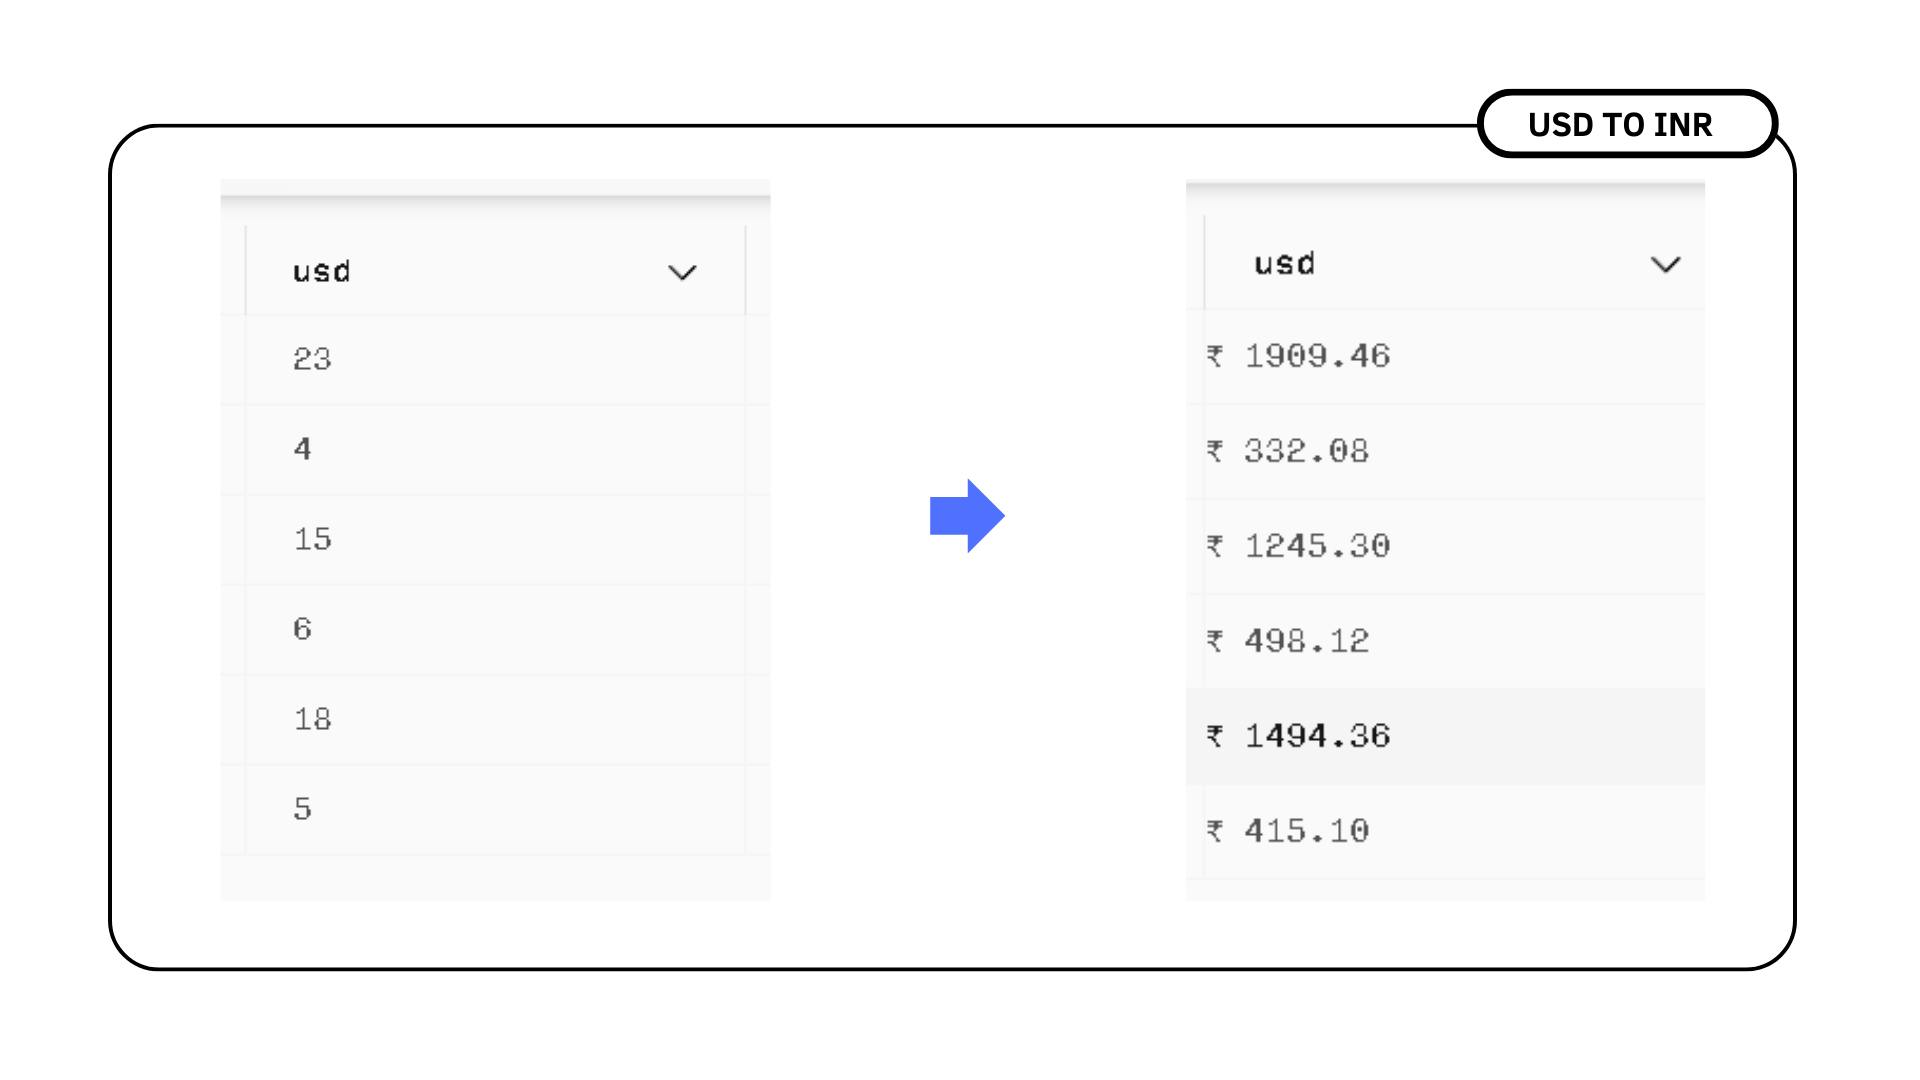
2) Currency Plugin (USD TO INR)
It is useful in converting USD (United States Dollar) to INR (Indian Rupees). Creators can check their amount conversion if they link their payments to their outerbase table. A demo video is at the End of this Article.
// ONLY THE FUNCTION PART - FULL CODE IN GITHUB - LINK ATTACHED END OF ARTICLE
// This Function Allows us to fetch the exchange rates and convert the currency.
    async convertCurrency(value) {
        try {
            // Fetching the  real-time exchange rates using an API.
            const response = await fetch(`https://api.exchangerate-api.com/v4/latest/USD`);
            if (!response.ok) {
                throw new Error('Failed to fetch exchange rates');
            }
            const data = await response.json();
            // Converting the currency value to INR.
            const inrValue = value * data.rates.INR;
            return inrValue.toFixed(2); // Rounding to 2 decimal places.
        } catch (error) {
            console.error('Currency conversion error:', error);
            return value; // Returning the original value on error.
        }
    }

    // Lifecycle callback when the element is connected to the DOM.
    connectedCallback() {
        // Parsing the cell value and converting it to INR.
        const cellValue = this.getAttribute('cellvalue');
        this.convertCurrency(parseFloat(cellValue)).then((inrValue) => {
            // Displaying the converted INR value in the cell.
            const convertedValueElement = this.shadow.querySelector('#converted-value');
            convertedValueElement.textContent = `₹ ${inrValue}`;
        });
    }
3) Speech Plugin (Text To Voice)
Sometimes, Creators have Long text data in particular Columns, be it a story plot or an informative paragraph, Reading it becomes difficult as we have to expand the column length, which eventually won't fit the entire screen. This Speech Plugin will come in handy to Get the Browser to Speak out the Text. A demo video is at the End of this Article.
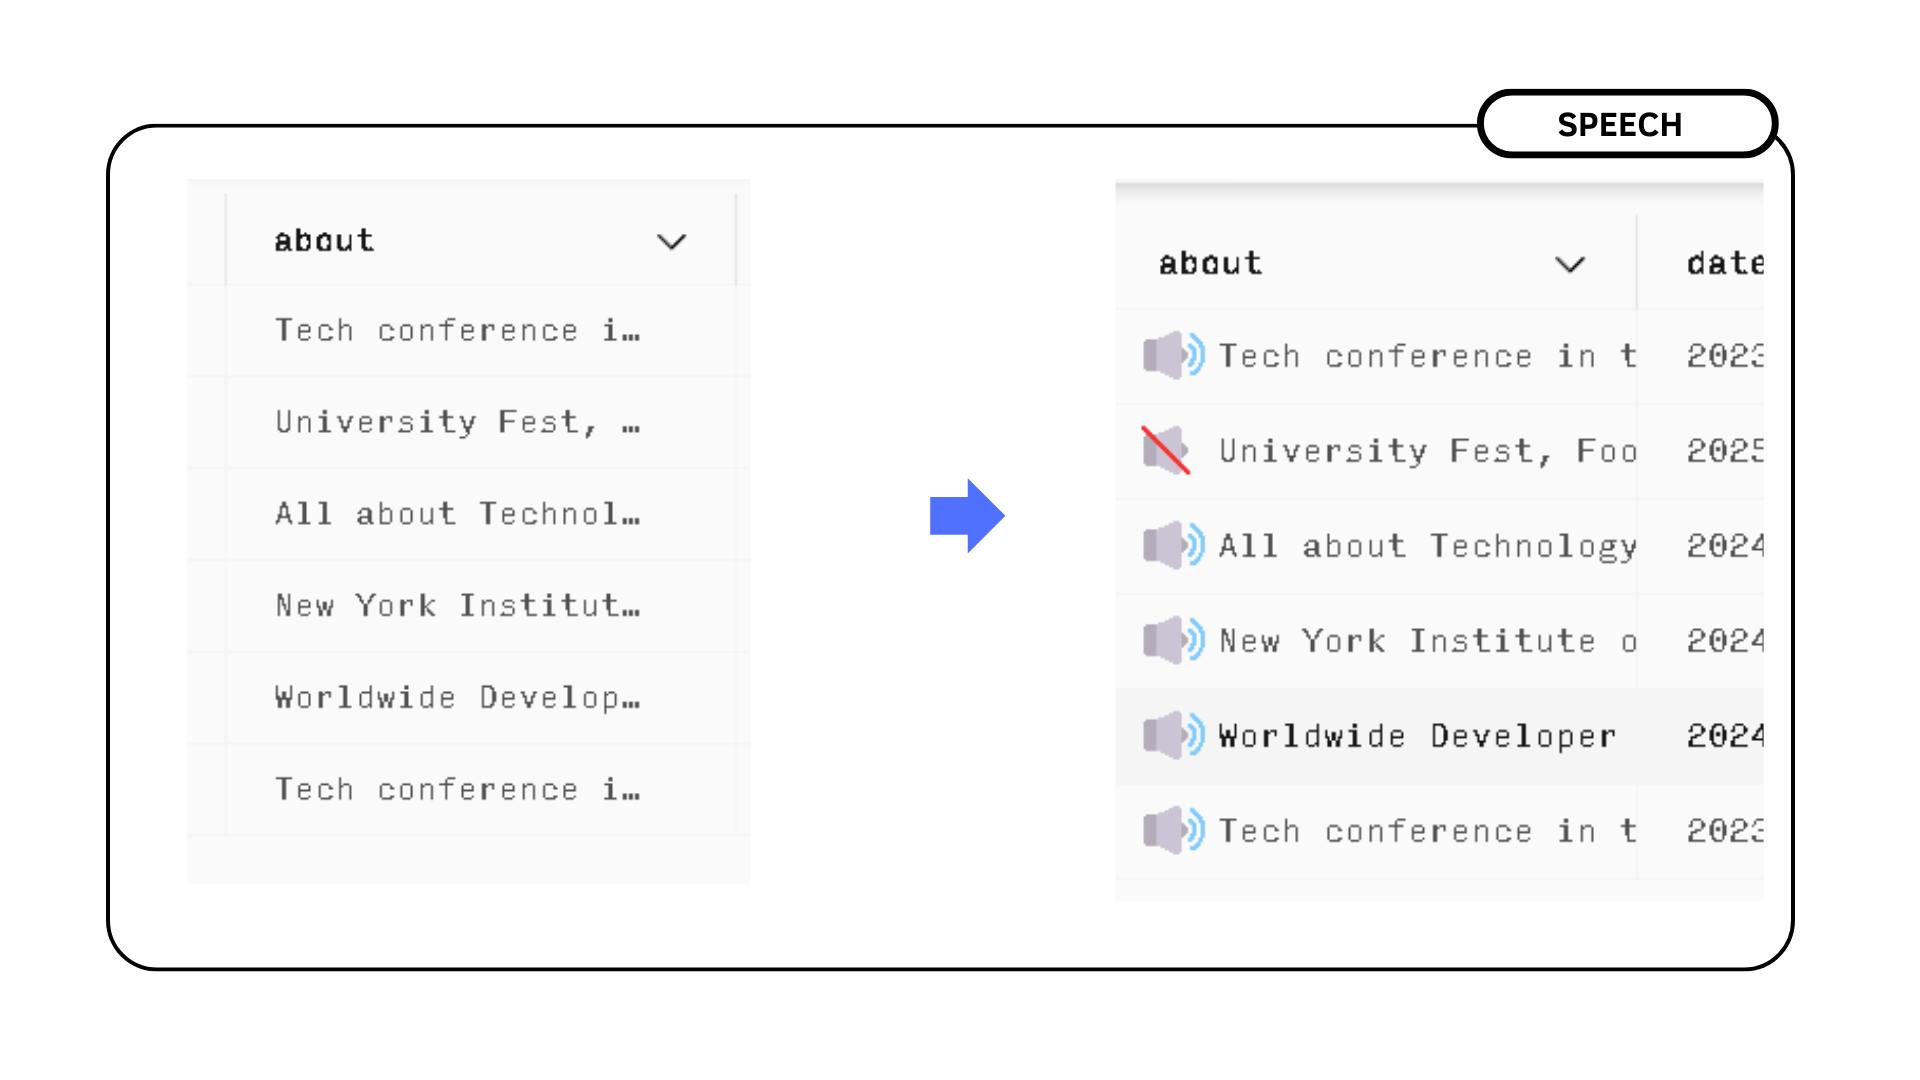
This function is used to speak the provided text using the Web Speech API. It checks if the browser supports the Speech Synthesis API ('speechSynthesis' in window). If supported, it creates an SpeechSynthesisUtterance object with the provided text, speaks it, and returns the utterance. If not supported, it displays an alert indicating that text-to-speech is not supported in the browser.
// ONLY THE FUNCTION PART - FULL CODE IN GITHUB - LINK ATTACHED END OF ARTICLE
    activeUtterance = null;

    // Function to speak the given text using the Web Speech API
        speakText(text) {
            if ('speechSynthesis' in window) {
                const synthesis = window.speechSynthesis;
                const utterance = new SpeechSynthesisUtterance(text);
                synthesis.speak(utterance);
                return utterance;
            } else {
                alert('Text-to-speech is not supported in this browser.');
                return null;
            }
        }

    // Lifecycle callback when the element is connected to the DOM.
    connectedCallback() {
        this.config = new OuterbasePluginConfig_$PLUGIN_ID(
            JSON.parse(this.getAttribute('configuration'))
        )

        const textElement = this.shadow.querySelector('#text')
        textElement.textContent = this.getAttribute('cellvalue')

        // click event listener to the sound button
        const soundButton = this.shadow.querySelector('.sound-button')
        soundButton.addEventListener('click', () => {
            if (this.activeUtterance) {
                // If an active utterance exists, stop it
                this.activeUtterance.onend = null; // Remove onend event listener
                window.speechSynthesis.cancel(); // Cancel the active speech
                this.activeUtterance = null; // Clear the active utterance
                soundButton.textContent = '🔊'; // Change button icon to "music"
            } else {
                // If no active utterance, speak the text
                this.activeUtterance = this.speakText(textElement.textContent);
                this.activeUtterance.onend = () => {
                    // Clear the active utterance when speech ends
                    this.activeUtterance = null;
                    soundButton.textContent = '🔊'; // Change button icon to "music"
                };
                soundButton.textContent = '🔇'; // Change button icon to "music off"
            }
        })
    }
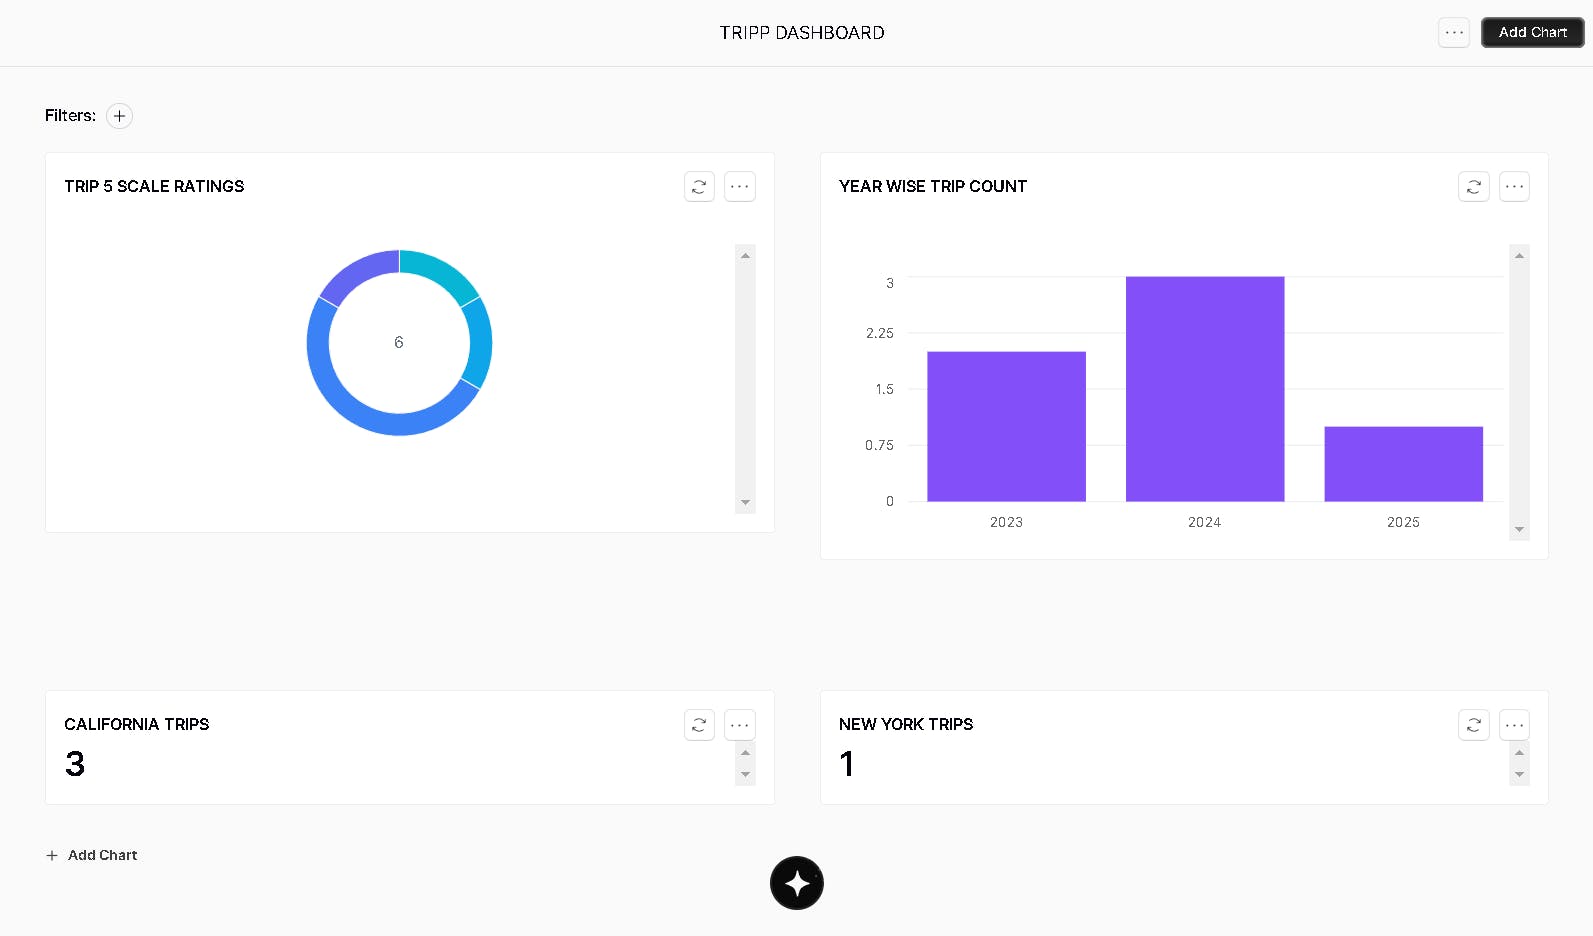
🦩 Outerbase Dashboard
These dashboards provide comprehensive insights and visualizations, helping content creators make informed decisions based on shared trip data.
Here In this Dashboard you can see I Made 4 Charts, First chart is 5 Scale ratings, when the Mouse is hoved over it, it shows the Number of Count in Each Number one to five.
The Second Chart is Yearwise Event Count, where the x-axis is the Years and the y-axis is the Number of Event Coming Up.
The Third and Fourth Count is Count of California and New york City Events Respectively.
SELECT rating, COUNT(*) as count FROM Tripp WHERE rating IN (1,2,3,4,5) GROUP BY rating

SELECT strftime('%Y', date) AS year, COUNT(*) AS count FROM Tripp GROUP BY strftime('%Y', date)

SELECT COUNT(*) as count FROM Tripp WHERE address LIKE '%california%'

SELECT COUNT(*) as count FROM Tripp WHERE address LIKE '%new york%'
🐈 Business Perspective
From a business perspective, creating a customized app using Outerbase for content creators offers a multitude of advantages. First and foremost, it provides content creators with a tailored solution that streamlines their data management and sharing processes along with collecting payments. This can significantly enhance productivity and efficiency, allowing creators to focus more on content creation itself. Moreover, a customized app powered by Outerbase can offer a competitive edge in the market, as it caters specifically to the unique requirements of content creators, making it an attractive proposition for potential creators. Ultimately, Everyone is a content creator nowadays. marketing this Customised App powered by Outerbase may generate potentially higher revenues, making it a sound business investment in the content creation industry.
🤠 Conclusion
The proShare app, designed in Flutter and fueled by Outerbase, offers content creators and administrators a streamlined solution for managing and sharing event data and anything customizable effortlessly. From user-friendly data input to real-time one-click communication integration and engaging content creation through OpenAI, and quick Links for Payments, proShare simplifies the entire process. Outerbase's robust database management tools, including EZQL and data enrichment dashboards, elevate the app's functionality to new heights. As the world becomes increasingly data-driven, solutions like Outerbase are at the forefront, making data management and sharing a breeze for content creators.
🎥 VIDEO DEMO & GITHUB LINKS
VIDEO DEMO FOR COMMANDS AND PLUGINS :
GITHUB LINK FOR OUTERBASE COMMANDS AND PLUGINS - https://github.com/akdeepankar/Outerbase-Commands-and-Plugins
GITHUB LINK FOR PROSHARE FLUTTER APP - https://github.com/akdeepankar/proShare-Flutter-and-Outerbase